Showing posts with label Camera. Show all posts

Thursday, March 7, 2013

Well, I Got This New Macro Lens

So, once again, I have been on the Ebays. This time I bought a new macro lens.  It's the Olympus OM-System Zuiko MC Auto-Macro 50mm f/3.5.  I took it out into the yard (and the kitchen) to take a couple of follow up photos from my last post.  All with the 5D.

The Valencia orange flowers are opening up.  They are the biggest citrus flowers on any of my trees. I caught a little spider waiting to catch the bugs drawn to the flowers by their delightful scent.

 
The Ein Shemer flowers (the only ones on the tree) opened up.  Looks like something's been munching on the leaves.


And finally, the orchid flowers in the kitchen are starting to open.  Background isn't that great, but the flowers are pretty.


So there you go, camera and garden.

Thursday, February 21, 2013

Olympus OM-System Zuiko MC Auto-W 35mm f/2 and The First Rose of Spring

Zuiko's on the right.
I added a new 35mm to the bunch.  The Zuiko 35mm f/2 doesn't have a reputation for being a great lens, but it was available for a good price, so I couldn't resist.  I put it through the same paces (more or less) as the Rokinon and Canon 35s I reviewed previously (here).

The new Zuiko was a bit scruffy on the outside, but the glass was perfect. Here are a couple more pictures.

Fronts

Butts
Here's the chart:


The Olympus sharpens up in the center by f/2.8 and there isn't really any noticeable sharpening  beyond that.  The edge is not great and doesn't really seem to sharpen up much at all with stopping down. The corners are dismal wide open and improve incrementally towards bad the more it is stopped down.  It's important to add that there is some weird glowy halation wide open that seems to affect only the bright highlights.  It has the potential to be distracting.


Here are the comparisons with the Rokinon and Canon 35mm:
 

It's hard to tell for sure, but I think the Zuiko has less color fringing than the other lenses at f/2 and is as sharp in the center, and maybe a hair sharper by f/2.8.  The Rokinon sharpness seems to lag behind the others just a wee bit throughout the range.

 
 Rokinon > Olympus > Canon at the edge of the frame. The Olympus and Canon both have chromatic abberation that the rokinon does not. They all get pretty close, sharpness wise, around f/8. Pretty poor showing for the canon.


Rokinon > Canon > Olympus in the corners.  The Rokinon is by far the winner here and it gets pretty sharp by f/4.  The Canon lags far behind the Rokinon and the Olympus is even softer. The hierarchy holds through the entire aperture range.

Here's the bokeh ball comparison:

 
 I think the Canon has the best bokeh balls wide open.  The Olympus gets some weird outlining near the frame edges due to mechanical vignetting. It also has a ninja star shape at f/2.8.  It's not awful, but it is the clear loser in this department.

Here are some Tiki torch photos like in the other review:


 The background blur might be a little better than the other two, but that might just have to do with the time of day I took these pictures.  Softer light. Certainly not a very significant difference.

On top of these pictures, here are some things that might be pertinent.  The olympus f/2s have a moving element that adjusts to maintain sharpness at close focus. This lens is pretty sharp at minimum focusing distance.  I also think it might have a more "3D" rendering than the other lenses.

So what's my conclusion?  The Rokinon and Canon are better.  If you can find the Olympus for less than $200 it's a good deal. It's a decent lens.  Fun to play with.

A couple of photos:

Orchid Blossoms: Canon 5D w/ Olympus OM Zuiko 35mm f/2 @ f/2.8, minimum focus distance

And finally, the first rose of spring. @f/4


Sunday, January 20, 2013

Canon 35mm f/2 Versus Rokinon 35mm f/1.4: a budget prime battle

David vs. Goliath
     It's becoming obvious to me that people like the camera bit more than the garden bit.  Maybe things will change once spring comes around.  So, without further ado, the 35mm comparison.


     I recently purchased the Rokinon(Samyang) 35mm f/1.4 UMC when I saw a deal for it online that I couldn't refuse.  $369 from Buydig.com. It's list price is $499, though you can usually get it a little cheaper than that.  Here's what you should know about it.  It's plastic, but solid and well made.  It is manual focus only.  It's huge, by far the largest lens I own.  It has a f/1.4 aperture.


     In the other corner we have the canon 35mm f/2.  I've had this one for a while, and I use it a lot on my T2i. It cost me $285 used and could be bought new for about $329 until it was recently discontinued.  It's replacement costs a paltry $849 with improved optical performance and image stabilization. The original is a fantastic almost normal lens on a crop sensor camera.  Here's what you should know.  It's plastic, light and compact.  It has autofocus and an F/2 aperture.

     Both lenses are way cheaper than you're other native mount options.  The fantastic new Sigma 35 f/1.4 will cost you about $899,  the Canon 35mm L will run you a little over $1300, and the Canon 16-35mm f/2.8 L II zoom might break the bank at $1499.  There's also the 35mm f/2 IS USM that I mentioned before.  (Bear in mind that these are prices from the time of post.)


    Here's a couple more pictures:
"My front element is bigger than yours!" -Rokinon

"You've got a big ol' badonkadonk!" Canon
     So you can probably guess that I'm going to tell you they are both good lenses and they both have a place.  Well I am.  If you need f/1.4, f/2 isn't going to do.  If you need autofocus, manual isn't gonna work.  If you want to be inconspicuous, the canon is the obvious choice.  Ok.  Enough of that.  So how do they compare?

     First up are the resolution tests.  These are not as scientifically done as they should be, obviously in places, so they shouldn't be taken as absolute.  They do generally show the differences.  I taped some Air Force 1957 optical charts in the center, at the top, and in the upper left hand corner of a crappy painting I painted.  I then shot photos at varying apertures, with the painting completely filling the frame(I didn't line everything up perfectly, as you will see.) Oh, and this was done with my T2i using live view focusing, so this is representative of an APSC sensor.  Corners will be even worse on a full frame.  My 5D doesn't do like view.  That's why I didn't use it,. Before I show you the pictures, I want to let you know the first difference.  The Rokinon has a slightly longer focal length than the Canon.  I had to move the tripod back a bit.


    You can see that the canon's fairly sharp in the center and loses sharpness towards the edge and corners at all apertures.  It vignettes pretty heavily and has some pretty intense purple fringing at wide apertures. 


     The Rokinon is pretty weak at f/1.4, but certainly sharpens up nicely.  There is much less loss of sharpness toward the corners.  It also seems to have less purple fringing.

Here are the comparison photos:


     The Canon looks like it might be a little sharper at f/2 than the Rokinon, but it has way more purple fringing.  They both sharpen up nicely by f/2.8.  It looks like they both are starting to lose a little sharpness by f/8.

     The Rokinon wins hands down here.  The canon doesn't ever catch up.

     Once again the Rokinon wins and the Canon never catches up.  The Canon also appears to vignette more prominently. 

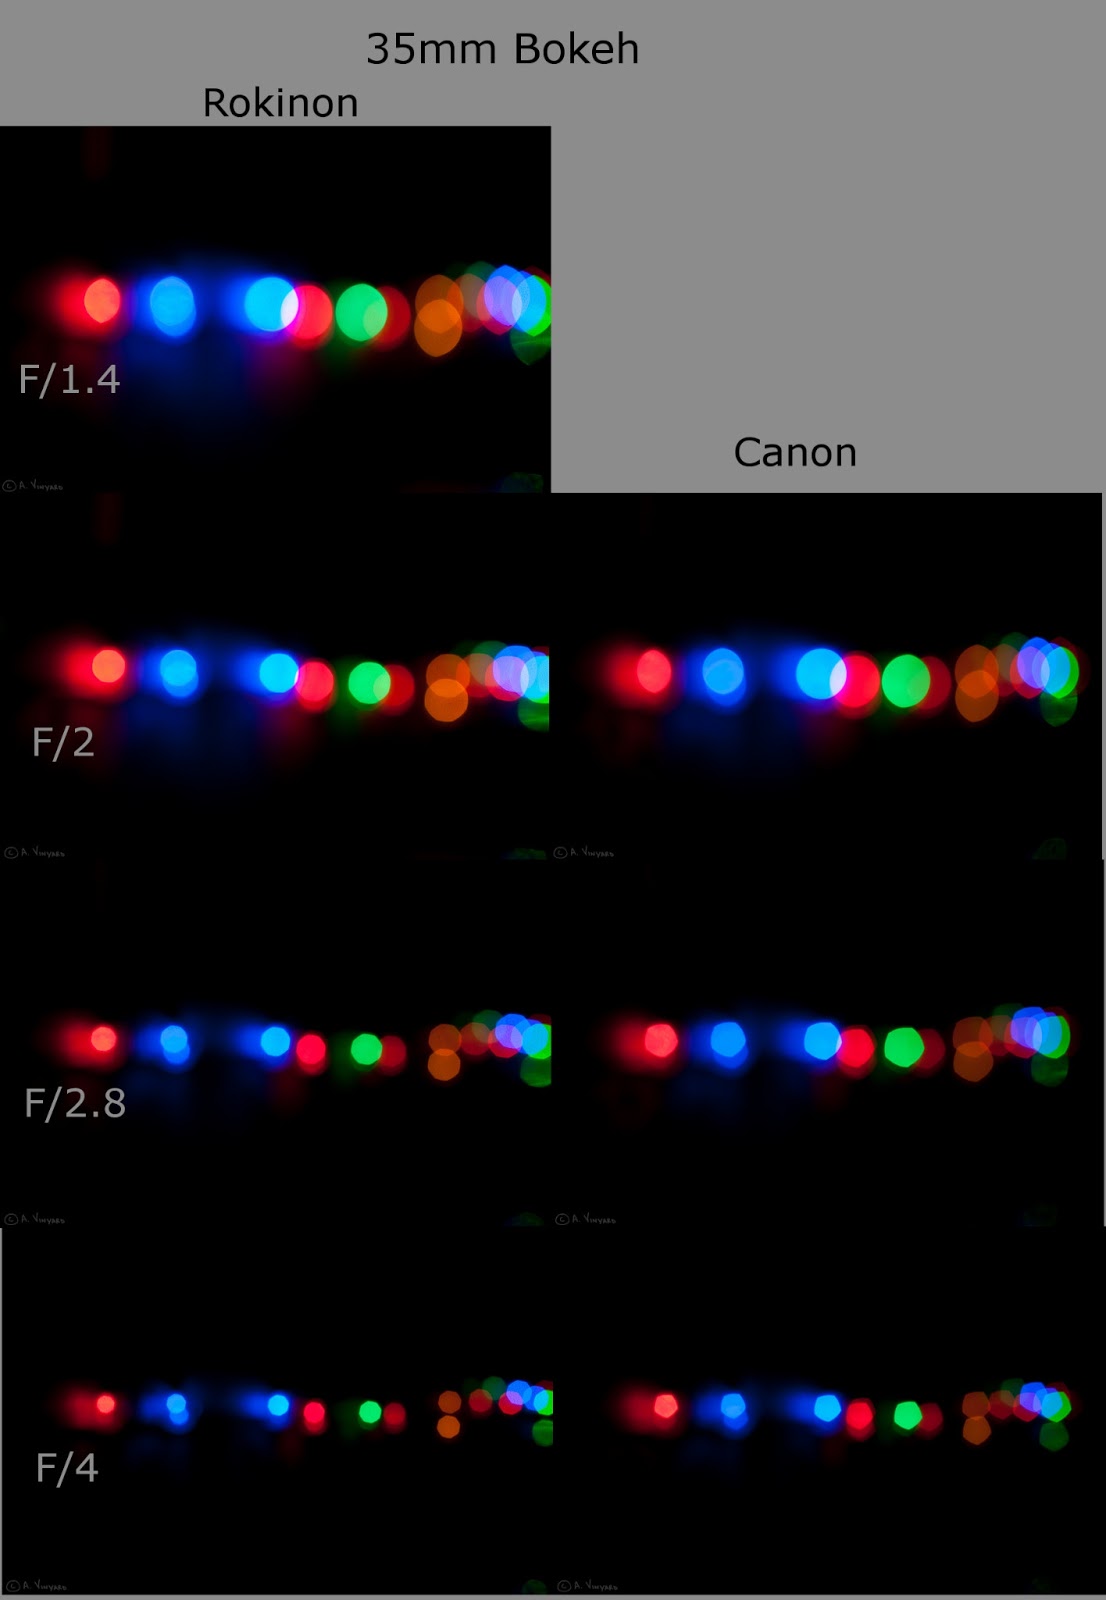
Now sharpness isn't everything.  How 'bout them bokeh balls?  These were shot on the full frame 5D, hand held.  Once again, not scientific.


     I think they are both pretty decent.  They both cat's eye a bit wide open.  You can see a little bit of spirally funky texture on the Rokinon, but it's pretty subtle.  The Canon is pretty smooth across the range.  Octagons vs. Pentagons.  I think octagons win, but it's not a huge win.

Following are some more bokeh comparisons from the backyard during the day.  Everyone says the canon has nasty bokeh when it comes to busy backgrounds.   

Rokinon f/1.4:

Canon f/2:

Rokinon f/2:

Canon f/2.8:

Rokinon f/2.8:

Canon f/4:

Rokinon f/4:
     I think the Rokinon might have the edge here, especially when stopped down.  Neither are stellar though, and I think they both look better wide open.  Obviously the exposures aren't perfectly matched.  The two lenses meter a bit differently on the 5D.

Here is busy background when focusing on an up close object.  Exposed for the background, so the tiki torch is blown out.  That's what happens when you shoot during the day.  I wanted you to see the background.

Rokinon f/1.4:

Canon f/2:

Rokinon f/2:

Canon f/2.8:

Rokinon f/2.8:

Canon f/4:

Rokinon f/4:

    Well, I don't know.  Neither are great, but I've seen far worse.  The Canon does seem to be a little warmer, though.

   I guess the proof is the the pudding though.  In regular use, it's obvious to me that the Rokinon is the better lens.  It just sharper, and in real world use, the bokeh feels creamier.  It just seems to be a smoother lens.  Check out the following photos and decide for yourself.  Both are a good alternative to the more expensive options.  The Rokinon is pretty amazing for the price, if you can handle the manual focus.  The canon is a perfect small normal lens for my T2i.

These pictures are all shot on the 5D at iso 400.  Aperture and shutterspeed vary.

Canon:


Rokinon:


Monday, November 26, 2012

Deconstructing The Olympus OM H.Zuiko 24mm f/2.8

"Eureka!": Canon T2i, EF-S 60mm f/2.8 Macro USM
     Well.  I am not as prepared today as I thought I was.  I have a pile of things I want to blog about, but they all seem to get piled up on one another, and then i go to write and discover that I am missing some of the pictures I need.

     Never fear, though, for I have a topic, it just wasn't the one I was planning on, although it makes sense in the natural progression of things. So, without further ado, I dismantle the Olympus Zuiko 24/2.8.

  
     It really is pretty amazing how these things are put together inside. I never really understood the cost of a lens until I started taking them apart.  They are pretty much a modern marvel of mechanics.  I bow to anyone who designs optics. I can't imagine anything more challenging.

    Now, if you read my last post, I said I was going to show you what happens when you go into a lens from the front. If you recall, I have two copies of this lens.  I gave up on the first copy, and now I need to clean some gunk and fix the aperture in the second, and optically superior copy.  This is the one I want to keep.

   So I gathered my tools.  You will laugh when you see them. Please do. I deserve to be laughed at (and probably chastised) for using them.  Better tools are on my Christmas list this year.

   The first task is to get the front retaining ring off.  This is the piece with the writing on it.  There are two little slots on opposite sides of the retaining ring. These are for a spanner wrench, which is a special, and surprising expensive tool.  I have fashioned my own.

The elegant spanner

    A paper clip works, but you have to be careful.  Since it is obviously not the appropriate tool, if it slips, which it is prone to do, you can scratch something pretty good.

   Once you get it loose you can unscrew it more easily using a friction tool.  You can get a set from http://www.micro-tools.com/. They're basically just a set of rubber cones("It's a cone!").  You can find the other proper tools there as well. Here is my friction tool(Hee hee, I said "friction tool"!).


Purple nitrile glove and water bottle cap...


...in action.

     Once you get it off, you're in dangerous territory.  Don't turn the thing over, or things will come off, and you will 100% most definitely lose the tiny ball bearing that makes the aperture clicks for each stop.

     You will lift the retaining ring off and also the ring with the filter thread on it.  Underneath will be a silver ring with some holes in it that the ball bearing fits into. The best way to keep from losing the ball bearing is to remove the aperture ring(the ring with all the teeth) and the silver piece together(hold them together) and set them aside as a single, assembled group.  Lift up and off.


OMG, It's the ball bearing!

Then you will see a little stainless notch (it fits into a hole in the aperture ring).  This is the physical connection between the aperture and the aperture ring.

Aperture Lever
     Now, using your spanner(actually your fingers might work, mine did), you can unscrew a large portion of the optics as one piece.  If you need to clean in there, then you can further dismantle it.  Fortunately, I didn't need to get in there.  My problems were behind these elements. Here is what the piece looks like.


Front optical elements


     Once you get the front optical elements out, Voila! you have reached the aperture. A ridiculously complex little thing.  The two screws that attached the aperture lever to the aperture had fallen out(they fell out of the lens during an earlier operation, so i knew something was wrong somewhere), and to my luck and surprise, the dust spot that was showing up in the bokeh was on the element you see directly below.  I blew out the inside of the lens with the rocket blower and cleaned the element with some lens cleaner and a microfiber cloth.

Aperture open

Aperture stopped down to f/16

These screws came loose and were screwing everything up.

Now. All you have to do is put it back together.  It's important to pay attention to what you're doing so you remember how it goes back together.  As far as what I did here, it's not too hard.  You just screw the optical elements in until the unit is finger tight.  Then you put the aperture ring back on, making sure the aperture lever fits in the little hole in the ring(remember to do this with the other rings together as a group as to not lose the ball bearing). Once the aperture ring is lined up correctly, you can screw the retaining ring back on using your friction tool, and at the end, your spanner to tighten it up.

     I may have over simplified it a little bit, but generally every piece has some little notches that have to line up to allow everything to snap into place correctly. You can't put it back together wrong.  Now if you do some other things, you can put it back together wrong, so don't tear this lens apart with reckless abandon. But for this procedure you're safe.  When you start taking screws out, make sure you keep track of them(they are tiny) and remember what goes where.  Also, if you start taking individual elements out, make sure you don't put them back in facing the wrong direction.  You're done for if you do. Please bear in mind that most of these pictures are much larger than actual size.

   Of course, good intentions be damned. I have a perfectly working aperture now, but it appears a new planet transits the sun.
Could that be Mercury in its transit of the sun?


(P.S. If you like athletic Greek women you should do a google image search for "voula" like I did when I was trying to make sure I spelled voila correctly)